Updating kernel and bootloader on BeagleBone Black Wireless
by Mike Krinkin
I continue going through Bootlin training materials on embedded systems and Linux Kernel. In this article I will cover building and updating Linux Kernel and U-Boot on my BeagleBone Black Wireless, but the same instruction should apply for BeagleBone Black.
Preparations
This article assumes that you already now how to connect to the device via debug serial port and get into the U-Boot console. This part was covered hopefully in enough details in the previous post.
In the previous post I also meantioned that we don’t need a memory card, but this time around we, unfortunately will need it. So make sure that you have a micro SD. Format the memory card to have a primary bootable partition of type WIN95 FAT32 (LBA) (partition code 0xC) with FAT32 file system formatted on top of the partition.
NOTE: I’m not going to cover how to format the memory card, but it should be fairly easy to find instructions on how to use fdisk, for example, to do that.
Beside the memory card we would need some software. At the very least we need U-Boot and Linux Kernel that we want to install on the device and the tools required to build them.
In this post I will cover how to load Linux Kernel on the device remotely using TFTP. This will not store the Linux Kernel on the device permanently and, as a result, it’s not an appropriate method to create a device that will be able to work standalone. However, if you are developing and need to change Linux Kernel, U-Boot or other pieces of software often it’s easier to load them remotely.
On the same note, I will also use NFS for the root file system. That makes it easier to test other pieces of software on the device, but it comes with a caveat that we need to prepare the root file system to share via NFS.
So let’s download, build and install the software we need. I will store everything inside the /home/kmu/ws directory, but you can pick the directory that works for you:
WS=/home/kmu/ws
cd $WS
Toolchain
To build Linux Kernel, U-Boot and BusyBox for BeagleBone Black or BeagleBone Black Wireless you will need a compiler for the ARM architecture:
sudo apt-get install gcc-arm-linux-gnueabi
You may need to install other software required for configuration and building (for example, flex, bison or ncurses), but they happened to be already installed on my machine, so I’m not covering them here.
Linux Kernel
Let’s start with downloading Linux Kernel:
cd $WS
git clone git://git.kernel.org/pub/scm/linux/kernel/git/torvalds/linux.git
cd linux/
git remote add linux-next git://git.kernel.org/pub/scm/linux/kernel/git/next/linux-next.git
git fetch linux-next
git checkout next-20200703 -b next
NOTE: I’m using the latest next branch for the Linux Kernel at the moment of writing. You may prefer to use the latest stable release instead. Using a stable version will simplify the debugging if something goes wrong, because you will know that at the very least the Linux Kernel is stable.
Now we need to configure and cross compile the new kernel using the installed toolchain. Cross compiling the kernel is relatively easy, all you need is to set a couple of environment variables that specify the architecture and the toolchain to use:
export ARCH=arm
export CROSS_COMPILE=arm-linux-gnueabi-
The next step is to configure the kernel. The kernel configuration is somewhat complicated due to sheer amount of options to configure, fortunately enough for some supported platforms there are default configurations provided:
make omap2plus_defconfig
We also want to use the power USB cable to establish a network between the host computer and the board.
NOTE: BeagleBone Black Wireless doesn’t have an Ethernet port, but even if it had my laptop doesn’t have an Ethernet port. So if it’s possible to use the USB power cable for networking as well, then it would be convenient.
In order to do that we need to enable a few more configuration options. To get to the configuration menu I use this:
make menuconfig
In the menu we need to find and enable the following options:
- CONFIG_USB_GADGET=y (Device Drivers > USB support > USB Gadget Support)
- CONFIG_USB_MUSB_HDRC=y (Device Drivers > USB support > Inventra Highspeed Dual Role Controller > MUSB Mode Selection > Gadget only mode)
- CONFIG_USB_MUSB_DSPS=y (Device Drivers > USB support > Inventra Highspeed Dual Role Controller > TI DSPS platform)
- CONFIG_NOP_USB_XCEIV=y (Device Drivers > USB support > USB Physical Layer Drivers > NOP USB Transceiver Driver)
- CONFIG_AM335X_PHY_USB=y (Device Drivers > USB support > USB Physical Layer Drivers > AM335x USB PHY Driver)
- CONFIG_USB_ETH=y (Device Drivers > USB support > USB Gadget SUpport > USB Gadget precomposed configuration > Ethernet Gadget (with CDC Ethernet support))
Now all it takes is to build the kernel:
make -j 8
If the build is successfull you should be able to find a few files that will be important for us later:
ls -l arch/arm/boot/zImage arch/arm/boot/dts/am335x-boneblack-wireless.dtb
NOTE: am335x-boneblack-wireless.dtb is a [DeviceTree] file that is specific for BeagleBone Black Wireless. For the BeagleBone Black you should be able to find a different [DeviceTree] file in the same directory.
U-Boot
With U-Boot the process is fairly similar to what we’ve seen above for the [LinuxKernel]:
cd $WS
git clone git://github.com/u-boot/u-boot.git
cd u-boot
export ARCH=arm
export CROSS_COMPILE=arm-linux-guneabi-
make am335x_evm_defconfig
Before actually building U-Boot a few words about how BeagleBone Black and BeagleBone Black Wireless boot. For a more detailed overview please refer to the TRM starting from the paragraph 26.1.8.5.3 Booting Procedure. What I want to draw attention here is that the board supports booting from raw device and booting from a file system.
In the raw mode the firmware will look for the bootloader in certain parts of the EMMC. When booting from the file system the firmware will treat the EMMC as a FAT file system and will look for files with certain names instead. I find the second option more convenient to use because it allows for an easier update of U-Boot - all we need is to just copy the right files to the file system.
Therefore I need to configure the U-Boot to work with that file system. More specifically, I want to be able to save U-Boot configuration on the file system and the default configuration does not allow that. So we need to change a few pieces:
make menuconfig
Here are the options I want to change:
- CONFIG_SYS_EXTRA_OPTIONS=”EMMC_BOOT” (Boot images > Extra Options (DEPRECATED))
- CONFIG_MTD_RAW_NAND=n (Device Drivers > MTD Support > Raw NAND Device Support)
- CONFIG_SPL_OS_BOOT=n (SPL / TPL > Activate Falcon Mode)
- CONFIG_SPL_NAND_SUPPORT=n (SPL / TPL > Support NAND flash)
- CONFIG_ENV_FAT_DEVICE_AND_PART=”1:auto” (Environment > Device and partition for where to store the environment in FAT)
And now let’s build it:
make -j 8
A successful build should produce a bunch of file. We care about two of them:
ls -l u-boot.img MLO
Roughtly speaking MLO is a first stage bootloader that should be small enough to fit into a small amount of memory. The goal of MLO is to load the proper bootloader u-boot.img that will not be as constrained as the MLO.
Root file system
Finally, we need a root file system to share via NFS. Root file system should contain tools that we might need available on the device as well as initialization script.
Initialization script is basically the first program that is run on the board after the kernel itself is loaded. Normally, it should setup some environment for the platform to work properly, like, mount required file systems and so on.
cd $WS
git clone git://git.busybox.net/busybox.git
cd busybox/
export ARCH=arm
export CROSS_COMPILE=arm-linux-gnueabi-
make defconfig
And again I’m going to make a few alterations. In particular, I will need to prepare a directory that will be shared over NFS as a root file system and point the BusyBox build files to that directory. Additionally, I will configure BusyBox to build static binaries.
mkdir $WS/nfsroot
make menuconfig
In the configuration menu I will set the following options:
- CONFIG_STATIC=y (Settings > Build static binary (no shared libs))
- CONFIG_PREFIX=”../nfsroot” (Settings > Destination path for ‘make install’)
make -j 8
make install
After this commands we should have a bunch of files inside the ../nfsroot directory remotely reminding of the normal Linux file system structure.
There we will need to create the root script in the etc/init.d/ directory in the file named rcS:
#!/bin/sh

mount -t proc none /proc
mount -t sysfs none /sys

exec sh
The initialization script above just mounts a couple of basic Linux file systems used by various tools and drops into the shell.
TFTP
Now we need to configure TFTP server that U-Boot will contact to download the [LinuxKernel] image. Fortunately TFTP is so simplistic that the TFTP server requires basically no configuration:
sudo apt-get install tftpd-hpa
By default, the directory that the [TFPT] server will serve the data from is /var/lib/tftpboot. That can be changed however by editing /etc/defaults/tftpd-hpa.
NOTE: there are a couple of TFTP implementations available from Ubuntu repositories. I found that tftpd-hpa is a slightly more understandable, but the difference is marginal.
All we need to do now is to copy the kernel we built and the [DeviceTree] file to the right directory:
cd $WS/linux
sudo cp arch/arm/boot/zImage /var/lib/tftpboot
supo cp arch/arm/boot/dts/am335x-boneblack-wireless.dtb /var/lib/tftpboot
Now, every time we rebuild the kernel we would need to copy the new version to that directory as was done above and that’s it.
NFS
Finally, we need to configure NFS to be able to share our root file system:
sudo apt-get install nfs-kernel-server
sudo echo "/home/kmu/ws/nfsroot 192.168.1.100(rw,no_root_squash,no_subtree_check)" >> /etc/exports
sudo /etc/init.d/nfs-kernel-server restart
NOTE: 192.168.1.100 is the address I’m using for the board. You’re free to pick whatever address you want. I chose 192.168.1.100 because the subnet 192.168.1.0/24 wasn’t used in my system anywhere.
With NFS working to share anything with the board all you need to do is to drop a file into the nfsroot directory on the host machine and that file will be immediately available on the board.
Memory Card
One last note, is that we need to store the MLO and u-boot.img on the memory card. We will boot the board from the memory card using them. The reason I do that is because I could not find a way to make network configuration work with the default U-Boot installed on the board.
Flashing the board
Now when everything on the host is ready we need to prepare the board. As I mentioned above the board supports two kinds of the boot processes: booting from a raw partition and booting from a file system.
The board firmware first tries to find the bootloader on the raw partition and boot from the raw partition. If that was unsuccessful then it fails over to booting from a file system.
My board by default was using the booting from the raw partition. Therefore to swtich to boot from a file system I had to properly format the onboard EMMC and zero-out parts of the EMMC that store the old bootloader.
Booting from memory card
We have a memory card with the bootloader we built earlier, how can we make the board to use it?
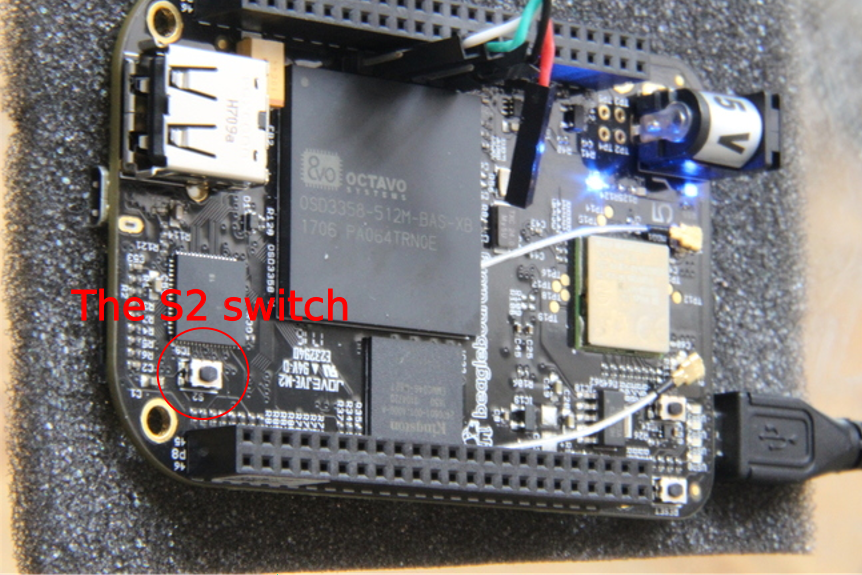
The board has a magic S2 button, we need to push this button before powering the board and it will automatically try to boot from the memory card.
Once you see the U-Boot prompt push SPACE to interrupt the boot process and drop into the U-Boot console, just like was described in the previous post.
Booting Linux Kernel
Now we need to instruct U-Boot to load the kernel via TFTP and instruct the kernel itseld to use NFS as a root file system.
Let’s start from configuring the networking over USB in the U-Boot console:
setenv ipaddr 192.168.1.100
setenv serverip 192.168.1.1
setenv ethact usb_ether
setenv usbnet_devaddr f8:dc:7a:00:00:02
setenv usbnet_hostaddr f8:dc:7a:00:00:01
NOTE: IP addresses are again arbitrary and can be changed, but they should be consistent with our NFS configuration and with host network interface configuration that will be explained below.
NOTE: MAC addresses are also arbitrary, but they do affect the name under which the USB network interface will be known in the host system.
Now let’s configure the host network interface. Following the advice from Bootlin I’m using the nmcli command to configure the host network interface:
nmcli con add type ethernet ifname enxf8dc7a000001 ip4 192.168.1.1/24
NOTE: the host interface name is just enx plus the MAC address above.
To check that everything works fine you can try to use TFTP from the U-Boot console:
tftp 0x81000000 zImage
The command above loads a file named zImage via TFTP and stores its content starting at address 0x81000000. You can use any file that you placed in the directory used by the TFTP server.
Next we need to tell U-Boot how to load the kernel and what command line arguments to pass it. In order to do that in the U-Boot console enter:
setenv bootargs root=/dev/nfs rw ip=192.168.1.100:::::usb0 console=ttyO0,115200n8 g_ether.dev_addr=f8:dc:7a:00:00:02 g_ether.host_addr=f8:dc:7a:00:00:01 nfsroot=192.169.1.1:/home/kmu/ws/nfsroot,nfsvers=3
setenv bootcmd 'tftp 0x81000000 zImage; tftp 0x82000000 am335x-boneblack-wireless.dtb; bootz 0x81000000 - 0x82000000'
The first command set the arguments that go to the linux kernel and the second command istructs U-Boot where to find the kernel and related files and where to place them in memory.
In order to actually boot the device using the kernel you need to enter in the U-Boot console:
boot
If everything goes fine, U-Boot should download the kernel and [DeviceTree] file over TFTP and place the in the right places in memory. Then it will pass the control over to the Linux Kernel it just put in memory and additionally will instruct the kernel to mount the root file system over NFS.
Once the load is finished you should have access to the terminal on the board.
Formatting eMMC
At this point we were able to boot the custom Linux Kernel and U-Boot, but the procedure we used is quite long and error prone. That’s quite the opposite of what we wnated to achive.
What we are going to do next is to format the onboard EMMC and put the U-Boot there. With EMMC formatted properly we will be able to save the U-Boot configuration on the internal storage. With the configuration saved on the internal storage we wouldn’t need to enter all those commands anymore.
Let’s start by mounting the memory card with U-Boot. In the terminal on the board:
mkdir -p /mnt/mmc0
mount -t vfat /dev/mmcblk0p1 /mnt/mmc0
ls /mnt/mmc0
With the external memory card mounted you should be able to access the U-Boot we saved there to copy to the internal storage. Instead of mounting the memory card you could have just copied the U-Boot to the nfsroot on the host.
Then next step is to format internal memory using fdisk. It’s done in a very similar way to how you do that with a memory card of a flash drive. The device name is /dev/mmcblk1.
You need to create an MBR partition table with one primary bootable partition of type WIN95 FAT32 (LBA) (partition code 0xC) and FAT32 system there. All the tools like fdisk and mkfs.fat are available from the BusyBox from our root file system.
One additional step we need to do is to zero-out raw boot partition that the board will search to find the bootloader before looking at the file system:
echo 0 > /sys/block/mmcblk1boot1/force_ro
dd if=/dev/zero of=/dev/mmcblk1boot1
You can now go ahead and mount the file system and copy the MLO and u-boot.img to the internal file system. Once you did it unmount the file system, remove the memory card from the board and reboot it.
When you see the U-Boot prompt press SPACE again to interrupt the boot process. Configure network and kernel arguments as was done before, but before booting the board using the boot command first run this:
saveenv
If everything goes fine you should see a meesage like this:
Saving Environment to FAT... OK
Now all our configuration is safely stored on the internal storage and next time you boot the board U-Boot will pull the stored configuration and use it unless you override it manually.
Instead of a conclusion
That was a long post, but it also covered quite a bit of ground. Fortunately enough you need to do this setup once per board and after that it you can easily test any software on the board (kernel, utilities and even the bootloader).
tags: beaglebone - uboot - linux-kernel - tftp - nfs - busybox